Fender-wing change

Lithuanian only blog entry.

Abstract:

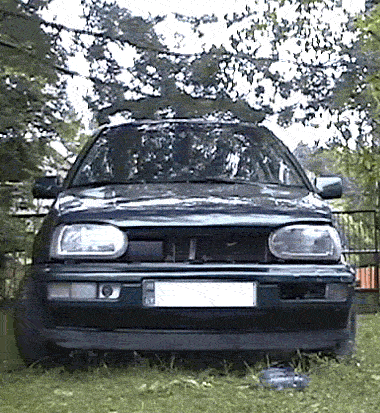
I decided to change front fenders for my car. As they are not original, I needed to try if they fit to the car. So one weekend was committed for car repair.

All you need is 3 spanners (wrenches) with metric size 8, 10 and 13. Also philips screwdriver and old blunt knife.

VW tuning :)
(please wait, it is 600kb animation)

First of all, remove grid with logo of the VW car. It is connected only with plastic retainers (fixers). Then, use wrench number 10 and remove bumper. Pull it to the front ant remove. Do not forget wires- disconnect them.

Now remove plastic protection under the fenders. They are screwed to the body of the car by several screws. Original are number 8, if repaired- then typically replaced with philips type.

Now you can remove the fenders. They are bolted to the body of the car with number 10 bolts and screws. 4 in the bottom and few on the top. One bolt is number 13- where capote is grounded, near antenna. If fender is original, it is glued to the body. Use knife here.

Posted in Anything | Leave a comment

Li-ion technology

The beginning was the damaged battery from my old video camera. The old battery for it was made from 6 (six!) NiMH cells. The cells were worn out and didn’t hold too much charge. Full loaded battery was emptied in 40 minutes of filming. Also, my mother managed to short circuit the battery and everything finished with lots of fumes and explosions. The original battery for mine camera is very expensive as camera is very old and quite rare. Now I needed to build new battery using cell bought from shop. There is two type of cells which can be used in my battery: NiMH and Li-ion.
I needed either 6 cells of NiMH technology or two of Liion. (Original battery is Li-ion). The price for both types of cells are quite high. The project was closed for a while. Recently I received few batteries from notebooks. They are build in circa 2005 and the cells are quite good. The batteries where discarded due to typical problem- on cell failure. The battery is 14.8V and 4400mAh. Inside there are 8 cells. So the battery organisation is 4×2 and cell is 2.2Ah.

Li-ion technology

Next stage- proper Li-ion charger for double cell battery. I digged few types of mobile phones, but all of them had only one cell charging controller. The controller is typically made by Benchmarq (now Texas Instruments). From good people, I received two sample chips for dual cell charger. It is BQ2057. And it was very good that I receive two chips. The first chip was damaged during construction. The schematics or the circuit diagram is typical, from datasheet. The transistor I used is from old HDD controller, some PNP, 2A one. Thermistors were from notebook batteries.

Li-ion charger schematics

The circuit was working, but as it is linear regulator, quite a lot of energy are waisted on regulating transistor. As wall plug is giving about 15V and the current is quite big for 2Ah cells. The transistor is getting very hot. So from old scrap I removed switching mode power regulator (from old LCD monitor stand). It is LM2576-5 (fixed output voltage). I attached trimmer to feedback circuit and regulated output up to 9.4V (assuming that voltage drop on power transistor is about 1V and the battery need to be charged to 8.4 or 8.2V).

step-down PSU

Both PCBs were glued together to one small unit. In the upper photo, on the left you can see the charger. I charged 5 pacs of cells. But one morning I found my charger dead- there was hole in the BQ2057 chip. I measured all the voltage around the chip and everything was in normal. It is quite mystical failure. Now I am waiting for new chips and I’ll try to build better charger. (hoping to receive switch-mode charger chips with “all included” version).

Posted in Anything | Leave a comment

Transceivers

I was testing radio link in our city and with mine country house. The testing transceiver was Kenwood TK-760G-1. I am a bit disappointed with the quality of radio link.

Kenwood mobile radio TK-760G-1 VHF FM transceiver

The frequency of radio is about 132? ~ 174 MHz. The output power is up to 25W. The transceiver was in high power mode and the antenna burned the hand quite well. The output stage of the radio is built using Mitsubishi RF module M67741H. The output power of the module in 150 … 175 band range is 35W when powered from 12.5V PSU. Inside the module there are two transistors (or maybe amps) and few passive elements. According to diagrams in datasheet, the module maybe can be used in FM band with transmitter like Veronica.

I was using simple quarter wavelength antennas. The link quality was poor. Even when I attached special external antenna placed on the roof. Meanwhile the radio link using old soviet transmitter was ideal. Ant the output power of Маяк (164MHz) transceiver is only 10…15W. Maybe the reason of it is the sensitivity of receiver? Bur in old radio it is about 0.4 … 0.8μV, while kenwood states 0.25 … 0.33μV. It is strange.

One more interesting moment- old soviet transmitter can be tuned to 0.2μV sensitivity and up to 50W (!) output power without changing components.

Now I need to reprogram Kenwood to other bands and test again. Maybe the used frequency is jammed? I soldered RS232 to TTL converter with MAX232 chip. Also found special software in the internet. While programing I receive “-PC-” on transceiver display and lot of errors on PC. Someone told, that kenwood PC link is very lame and I need to use old PC and exact cable like original one from kenwood. Damn capitalists- they use lame hardware to make user to buy original cables. Hundreds of dollars for fucking few transistor cable…

Posted in Anything | Leave a comment

Quite Hot Days 2

This Lithuania only blog entry. Just about that I found lots of wild hemp growing near my horse house. And my dog just tore the pillow.

Hemp, Cannabis, KanapÄ—s

Cannabis sativa, also known as hemp, is a species of Cannabis. It is a dioecious, annual herb. It has been used by humans throughout recorded history for its fiber, for its psychological and physiological potential as a source of drug material, and for the nourishment and oil of its seeds.

Mad dog

Vegos aršumo priepuolis

Posted in Anything | Leave a comment

Quite Hot Days

Due to some national holidays we had four free days. Ant the mother nature decided to show us some heat. In the shady spot it was about 30°C, ant the thermometers on the sunny side were “overloaded”.

hot

hot

Reader must understand, that Lithuania is quite cold country. The 22°C temperature is called “hot”. And quite rainy. So such hot is rare and dangerous. Ant it is wet hot. The hygrometer placed inside the “sealed” house is showing more than 80% of humidity.

And now some reminiscences from some not very old times, January 20, same year. This image is from Henkas blog and is about five months old:
Cold (c)by Henkas
In short- about 70 degrees of temperature swing.

Posted in Anything | 1 Comment

Broken heat pipe

I didn’t wanted to broke it. Really… I wanted only to bend it and adapt it for heat transportation from video card to computer case body. The heat pipe was manufactured with 180 degrees fold and I wanted to make it 90… The pipe popped and I heard some sucking noise. So, be careful with your pipes 🙂

broken heat pipe

I found few drop of some clear liquid and copper wire strand. I sniffed the liquid- no scent. I even tasted it- no taste at all. And I am still alive. I think, that in this cheap Chinese heat pipe there was simple water. The boiling point was reduced by lowering the pressure inside the pipe.

The heat pipe is working using physical effect that while some liquid boil, the temperature is the same. In the “hot” side of the pipe the liquid is boiled, vapor goes to the “cold” side and condenses releasing all the heat used in boiling. The the liquid goes to the “hot” side. The trick is in that strand of wires. It makes all process independent to the gravity.

The advantage of heat pipes is their great efficiency in transferring heat. They are actually a better heat conductor than an equivalent cross-section of solid copper.

Posted in Vandalising | 2 Comments

Compact flash size microdrive

From time to time I smash various hitech stuff. Just for fun and to look inside. So I decided to make special category for it.

The victim of this blog entry is three compact flash size micro drive disks. Each is 2 gigs size.

MD CF disk

I removed all stickers and metal shields and now you can see the interior of the disk drive. Just very small hard disk in CF size box. Recent flash rom technology made MD disk useless. Just imagine how this small hard disk spins at 4200 revolutions per minute and you just “drop” your mp3 player of photocamera on the table.

MD CF disk

Posted in Vandalising | Leave a comment

Chinese version of Graphics Equalizer

I found nice VFD display on one 5.1 surround sub-woofer. It was quite big, powerful sound system with some indicator to display signal spectrum. I removed indicator and become suspicious- the device was too simple to be real. After looking to VFD without color cover, I discovered that it is just cheap Chinese imitation. From the first sight it looks like real device:

VFD

But if you look to VFD, you can find that indication elements are connected in strange way- the spectrum of the signal is hard-coded to VFD:

VFD hardcoded spectrum

The PCB is very simple- only three LM324 quad operational amplifiers and bunch of resistors. Theoretically it can generate 12 levels of indication, but VFD is only with 9 anodes. Schematics are typical- comparaison of input signal with voltage divided by resistor network. When I feed-ed DC signal to the input I received nice “spectrum” of it.

VFD in action

Also, I like the mystic word “REVEL”. It looks like some “right” version of word “LEVEL”. This is nice illustration of Chinese-English vocabulary.

Next time, buying “cool” surround speaker system, be careful.

Posted in Anything | Leave a comment

New Tubes in Collection

New stuff was found in trash, so salvaged power amplifier from old tape recorder. It is made with with dual EL84 (6BQ5, 6П14П) tubes.

tube amp
One funny thing about this PCB. The tubes and most of components are made same year and same month as I was born. So they are as old as I am. 🙂

Also, I break apart few old TVs…

tube amp
… and removed nice set of power pentodes: 6П36С, 6П44С, 6П45С. They are quite powerful, and it is possible to build some audio tube amps from them. Or radio transmitter!

Posted in Anything | Leave a comment

Nixie low voltage PSU

Sometimes I need small high voltage power supply for my projects. And I don’t want to make special transformers. And I don’t want to use special chips for it. In internet I found very simple circuit diagram for classical step-up converter. It is base on very common 555 timer. The coil used in this schematics is bought in the shop.

Here is the schematics:
schematics circuit diagram for nixie step-up psu
Press for bigger image, for printing.

Some comments about this circuit diagram: I needed about 200V DC. During tuning I saw voltages going from Vin up to the voltage dangerous for diode, capacitor and mosfet. You only need to turn trimmer.

Theoretical values are printed in this circuit diagram, but during constructed I didn’t managed to collect exact values and used components from my spare part box.

So here is comments about replacement of components: First of all, T1 is MPSA42. Why author used high voltage transistor? Maybe he had lots of them. I don’t. The voltage here is only going to such level what 555 timer can handle- up to 18V. So I used more common transistor from computer power supply. It is C945 (50V, 0.1A, npn)
C9 capacitor is 100pF. C9 and R37 is typical snubber circuit, it filters out parasitic high frequency oscillations.
Trimmer R40 is 10K, R38- 470K. Diode D1 from old AT PSU, fast, high voltage diode FR154. L1 is from local hobby shop. They didn’t find any 100μH @ 1A, so I put 150μH.

Photo of the device

For my power, I didn’t need to put cooling radiator on Q1. Be careful, this device can shock you.

Posted in Anything | Leave a comment