
The beginning was the damaged battery from my old video camera. The old battery for it was made from 6 (six!) NiMH cells. The cells were worn out and didn’t hold too much charge. Full loaded battery was emptied in 40 minutes of filming. Also, my mother managed to short circuit the battery and everything finished with lots of fumes and explosions. The original battery for mine camera is very expensive as camera is very old and quite rare. Now I needed to build new battery using cell bought from shop. There is two type of cells which can be used in my battery: NiMH and Li-ion.
I needed either 6 cells of NiMH technology or two of Liion. (Original battery is Li-ion). The price for both types of cells are quite high. The project was closed for a while. Recently I received few batteries from notebooks. They are build in circa 2005 and the cells are quite good. The batteries where discarded due to typical problem- on cell failure. The battery is 14.8V and 4400mAh. Inside there are 8 cells. So the battery organisation is 4×2 and cell is 2.2Ah.
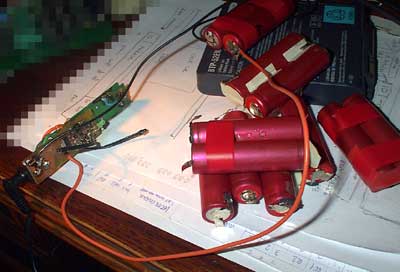
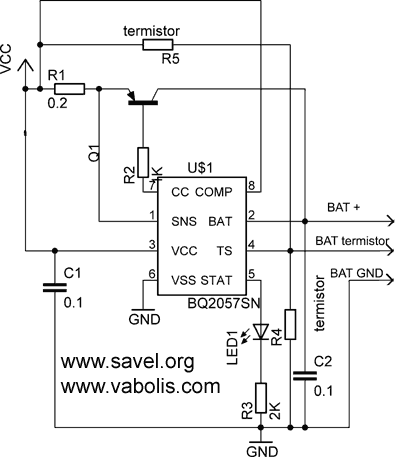
Next stage- proper Li-ion charger for double cell battery. I digged few types of mobile phones, but all of them had only one cell charging controller. The controller is typically made by Benchmarq (now Texas Instruments). From good people, I received two sample chips for dual cell charger. It is BQ2057. And it was very good that I receive two chips. The first chip was damaged during construction. The schematics or the circuit diagram is typical, from datasheet. The transistor I used is from old HDD controller, some PNP, 2A one. Thermistors were from notebook batteries.
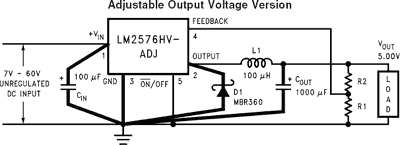
The circuit was working, but as it is linear regulator, quite a lot of energy are waisted on regulating transistor. As wall plug is giving about 15V and the current is quite big for 2Ah cells. The transistor is getting very hot. So from old scrap I removed switching mode power regulator (from old LCD monitor stand). It is LM2576-5 (fixed output voltage). I attached trimmer to feedback circuit and regulated output up to 9.4V (assuming that voltage drop on power transistor is about 1V and the battery need to be charged to 8.4 or 8.2V).
Both PCBs were glued together to one small unit. In the upper photo, on the left you can see the charger. I charged 5 pacs of cells. But one morning I found my charger dead- there was hole in the BQ2057 chip. I measured all the voltage around the chip and everything was in normal. It is quite mystical failure. Now I am waiting for new chips and I’ll try to build better charger. (hoping to receive switch-mode charger chips with “all included” version).